多次代理
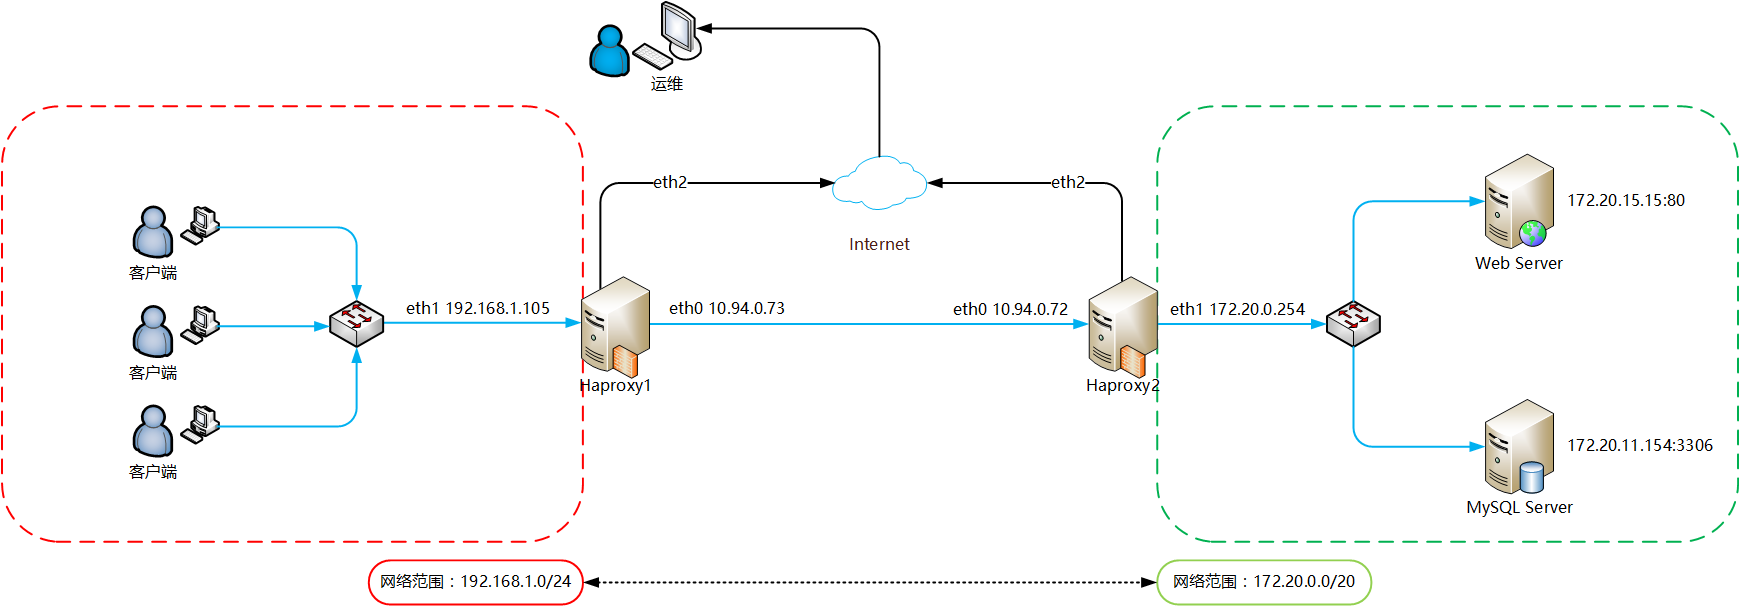
如上图所示,在 192.168.1.0/24 这个网段的客户端想要访问在 172.20.0.0/20 网段内的服务器,所有的通信又不想暴露在互联网上,因此可以在这两个网段内分别都放一台 Haproxy 服务器,并将两台 Haproxy 直连,10.94.0.73 到 10.94.0.72 互通,然后做两次代理即可。
Haproxy1 应该监听在 192.168.1.105 上以供 192.168.1.0/24 网段内的主机访问,然后指定源地址 10.94.0.73 将请求指向后端服务器 Haproxy2 的 10.94.0.72 。
Haproxy1 的配置
1 | global |
Haproxy2 应该监听在 10.94.0.72 以供 Haproxy1 的 10.94.0.73 来请求,然后指定源地址 172.20.0.254 将 Web 请求指向后端服务器 172.20.15.15:80,将 MySQL 请求指向后端服务器 172.20.11.154:3306。
Haproxy2 的配置
1 | global |
Web 负载均衡
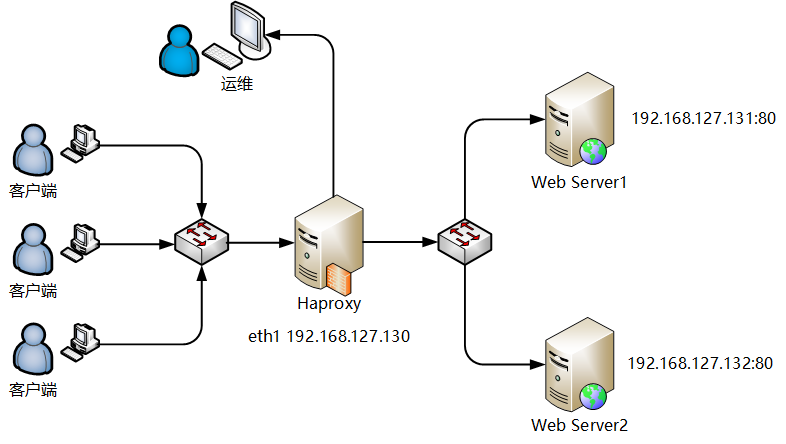
如图所示,客户端访问 192.168.127.130 时,要把请求分发到 192.168.127.131:80、192.168.127.132:80 这两台服务器上。这是一个最简单的负载均衡结构图,实现起来比较简单。
1 | global |
配置说明
- Global settings :这是第一部分的配置,全局配置;对Haproxy进程自身属性的设定
- proxys:对代理的设定,通常有4部分组成
- defaults:提供默认配置
- frontend:前端配置
- backend:后端配置
- listen:从某种意义上讲可以认为是将 frontend 和 backend 整合到一块的
ACL 匹配
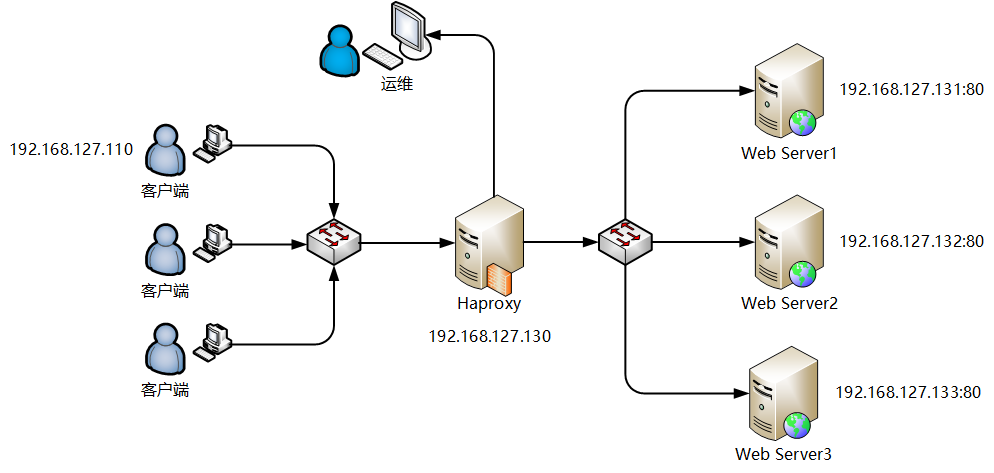
如图所示,要求
1、如果客户端的 IP 是 192.168.127.110,访问 192.168.127.130 时,要把请求分发到 Web Server3 上,即 192.168.127.133。
2、客户端访问 192.168.127.130 时,要把请求分发到 192.168.127.131,192.168.127.132,192.168.127.133 这三台服务器上。同时还要求客户端每一次访问,都跳转到不同的服务器上。
3、如果客户端访问的不是 192.168.127.130 而是 192.168.127.129 时,要把请求全部分发到 Web Server1 上,即 192.168.127.131。
1 | global |
状态监控
在其他的配置完成后,做一个全局配置区段,用来监控 Haproxy 服务器的状态。
1 | listen Haproxy_Status # 关联前端和后端定义一个完整的代理 |
配置好之后,重启服务访问 http://192.168.127.130:1080/status 即可看到状态信息。
记录日志
自己记录日志
1 | local2.* /var/log/haproxy.log |
交给日志服务器记录日志
配置 /etc/haproxy/haproxy.cfg
1 | log 127.0.0.1 local2 |
开启 rsyslog 记录 haproxy 日志功能,编辑 /etc/rsyslog.conf 找到如下配置项并去掉配开头的的注释
1 | # Provides UDP syslog reception |
添加如下内容
1 | # Save haproxy log |
配置 /etc/sysconfig/rsyslog
1 | # Options for rsyslogd |
相关解释说明:
- -r: 打开接受外来日志消息的功能,其监控514 UDP端口;
- -x: 关闭自动解析对方日志服务器的FQDN信息,这能避免DNS不完整所带来的麻烦;
- -m: 修改syslog的内部mark消息写入间隔时间(0为关闭),例如240为每隔240分钟写入一次”–MARK–”信息;
- -h: 默认情况下,syslog不会发送从远端接受过来的消息到其他主机,而使用该选项,则把该开关打开,所有接受到的信息都可根据syslog.conf中定义的@主机转发过去.
重启服务查看日志
1 | systemctl restart rsyslog haproxy |